1、优化内核参数
下面的参数按照8G内存来进行设置的,而且是通过nginx进行转发的情况下使用下面的配置,如果线上请用其他参数:
(1)安装并启用conntrack
apt install -y conntrack
modprobe nf_conntrack
查看是否安装成功【ls /proc/sys/net/netfilter/】

为conntrack设置哈希桶
echo 131072 > /sys/module/nf_conntrack/parameters/hashsize
(2)设置sysctl内核等参数
# vim /etc/sysctl.conf

fs.file-max = 1048576
fs.nr_open = 1048576
net.core.somaxconn = 16384
net.ipv4.tcp_max_syn_backlog = 16384
net.core.netdev_max_backlog = 16384
net.ipv4.ip_local_port_range = 1024 65535
net.core.rmem_default = 262144
net.core.wmem_default = 262144
net.core.rmem_max = 8388608
net.core.wmem_max = 8388608
net.core.optmem_max = 8388608
net.ipv4.tcp_rmem = 4096 87380 8388608
net.ipv4.tcp_wmem = 4096 65536 8388608
net.netfilter.nf_conntrack_max = 524288
net.nf_conntrack_max = 524288
net.ipv4.tcp_max_tw_buckets = 262144
net.ipv4.tcp_fin_timeout = 15
(3)设置文件描述符上限(nofile)(包括网络连接)
下面的三种方式针对的场景是不同的,都需要设置,不可替代。
步骤一:针对ssh登录用户
#vim /etc/security/limits.conf
* soft nofile 1000000
* hard nofile 1000000
root soft nofile 1000000
root hard nofile 1000000

#sysctl -p
步骤二:针对所有systemd服务,该设置均生效
# vim /etc/systemd/system.conf
    DefaultLimitNOFILE=1000000
#systemctl daemon-reexec
步骤三:手动启动命令时生效
#vim ~/.bashrc
    ulimit -n 1000000
#source  ~/.bashrc
2、设置时钟同步
apt install ntpdate  -y
ntpdate ntp.aliyun.com
3、各节点安装emqx
cd /opt
wget https://www.emqx.com/zh/downloads/broker/5.4.0/emqx-5.4.0-ubuntu18.04-amd64.tar.gz
mkdir -p emqx && tar -zxvf emqx-5.4.0-ubuntu18.04-amd64.tar.gz -C emqx
4、配置核心节点
# vim emqx/etc/emqx.conf
node {
  name = "emqx1@192.168.3.141"
  cookie = "emqxsecretcookiectcmp"
  data_dir = "data"
  process_limit = 1000000
  max_ports = 1000000
}

cluster {
  name = ctcmp-nm-emqxcl
  discovery_strategy = static
  static {
    seeds = ["emqx1@192.168.3.141","emqx2@192.168.3.144","emqx3@192.168.3.145"]
  }
}

dashboard {
    listeners.http {
        bind = 18083
    }
}

listeners {
  ssl.default.bind = "0.0.0.0:20442"
  ssl.default.acceptors = 64
  ssl.default.max_connections = 1000000
  ssl.default.max_conn_rate = "5000/s"
}

force_shutdown = {
  enable = true
  max_message_queue_len = 50000
  max_heap_size = 500MB
}

telemetry {
  enable = false
}
5、配置工作节点
node {
  #name根不同的节点进行变更
  name = "emqx2@192.168.3.144"
  cookie = "emqxsecretcookiectcmp"
  data_dir = "data"
  db_role = "replicant"
  db_backend = rlog
  process_limit = 1000000
  max_ports = 1000000
}

cluster {
  name = ctcmp-nm-emqxcl
  discovery_strategy = static
  static {
    seeds = ["emqx1@192.168.3.141","emqx2@192.168.3.144","emqx3@192.168.3.145"]
  }
}
dashboard {
    listeners.http {
        bind = 18083
    }
}

listeners {
  ssl.default.bind = "0.0.0.0:20442"
  ssl.default.acceptors = 64
  ssl.default.max_connections = 1000000
  ssl.default.max_conn_rate = "5000/s"
}

force_shutdown = {
  enable = true
  max_message_queue_len = 50000
  max_heap_size = 500MB
}

telemetry {
  enable = false
}
6、启动服务及一些操作命令
./emqx/bin/emqx start

#添加账号
emqx ctl admins add emqx_u EMQemq@1172
#更改密码
emqx ctl admins passwd emqx_u EMQemq@11721
#删除账号
emqx ctl admins del emqx_u
./emqx/bin/emqx start

#添加账号
emqx ctl admins add emqx_u EMQemq@1172
#更改密码
emqx ctl admins passwd emqx_u EMQemq@11721
#删除账号
emqx ctl admins del emqx_u
7、配置监听器(mqtts)
我们只配置ssl及wss两个监听器就行,另外两个保持默认就行
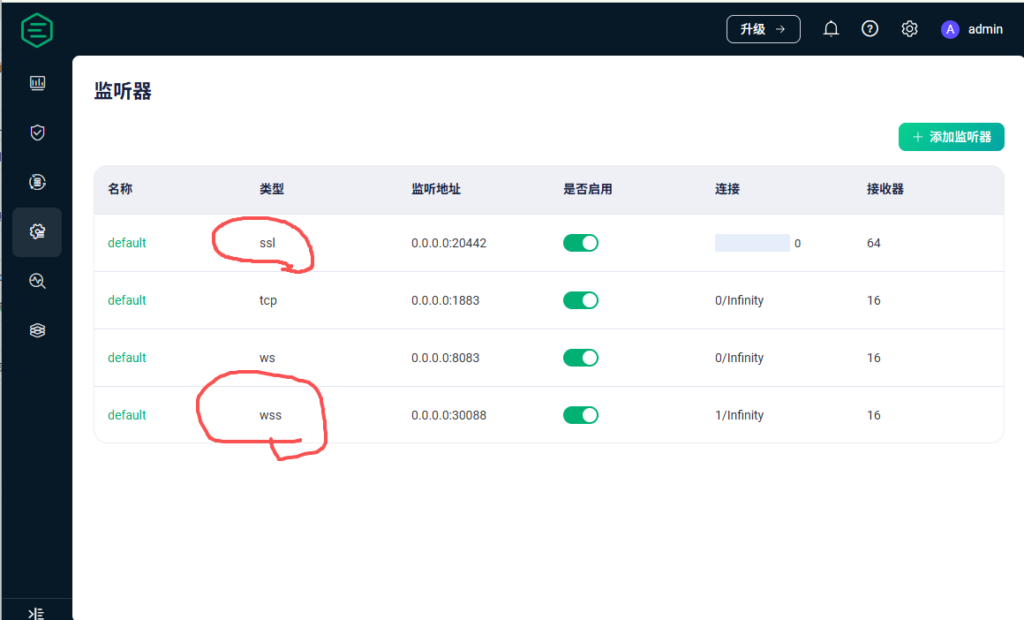
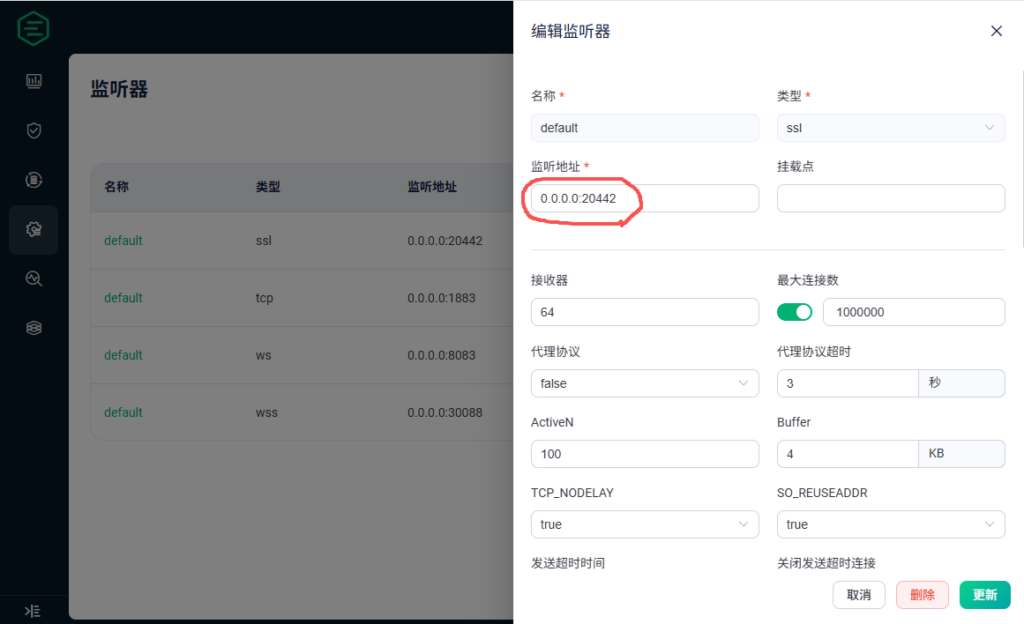
(1)配置ssl
配置监听端口为20442,其他的保持默认即可
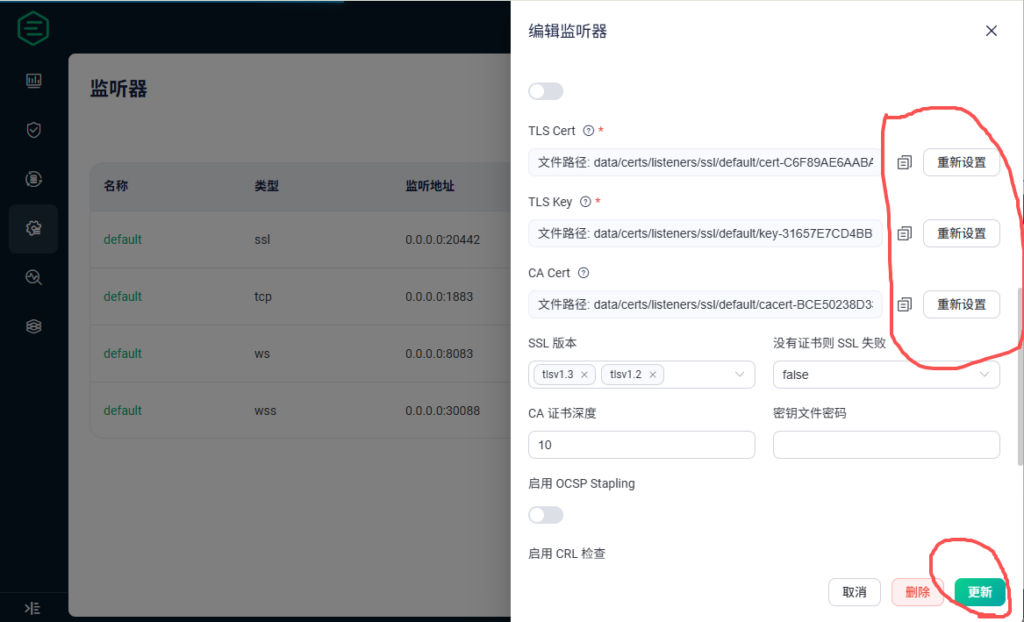
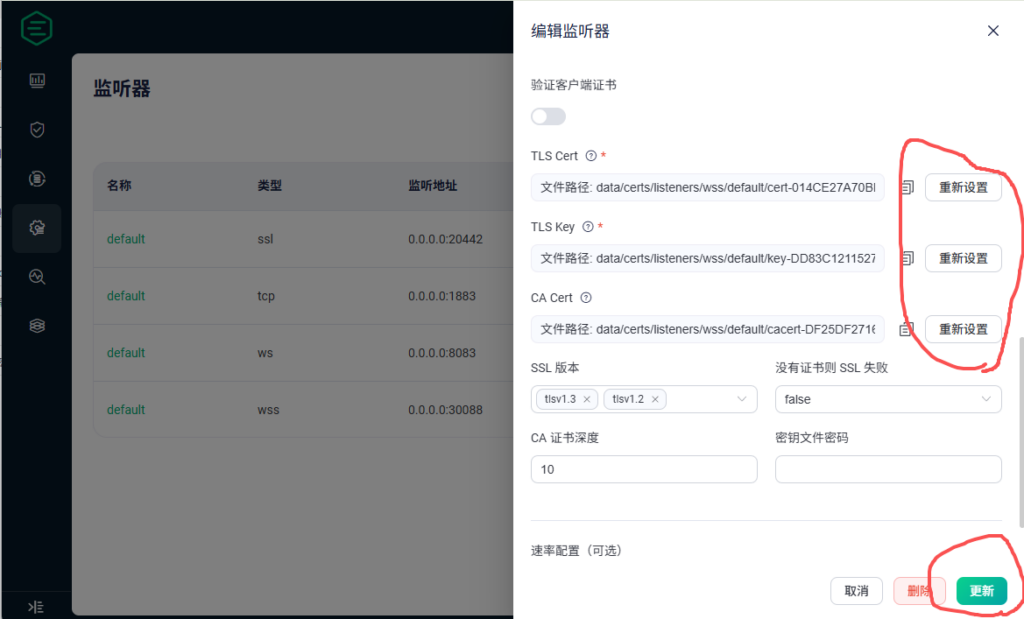
添加证书、私钥及根证书,直接将aolingo.com.pem、aolingo.com.key、CA-ROOT.crt三个文件的内容直接拷贝到对应的文件框中,然后点击更新即可。
(2)配置wss
配置监听端口为30088,其他的保持默认即可
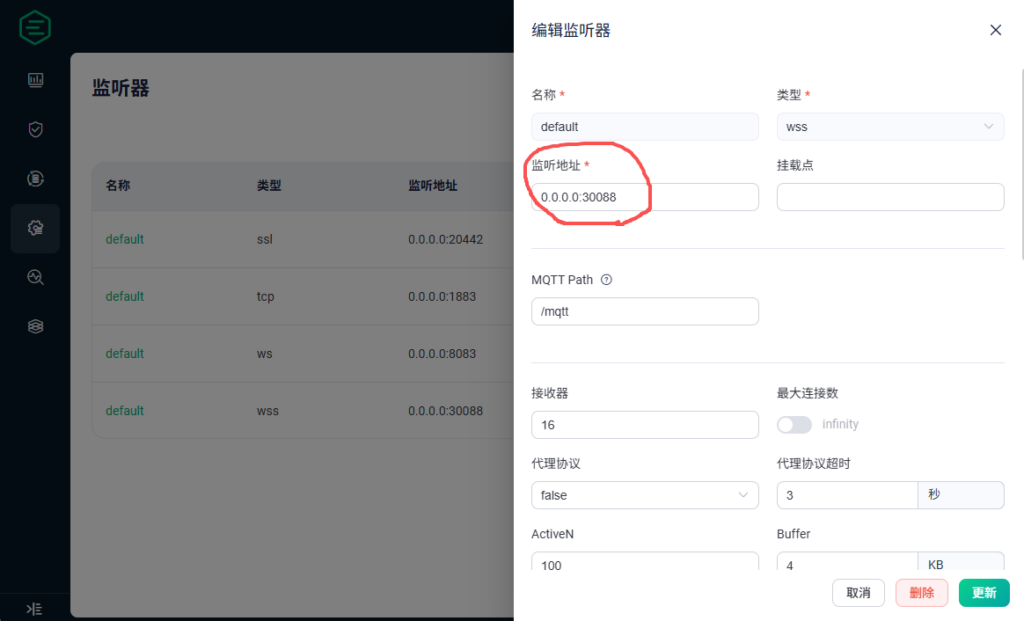
添加证书、私钥及根证书,直接将aolingo.com.pem、aolingo.com.key、CA-ROOT.crt三个文件的内容直接拷贝到对应的文件框中,然后点击更新即可。
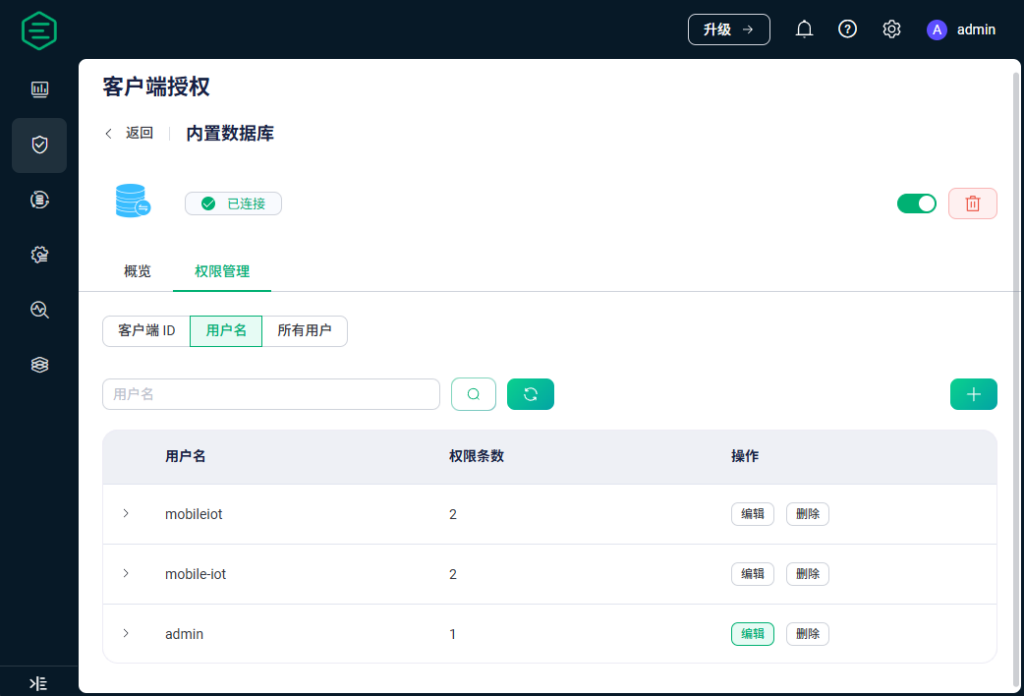
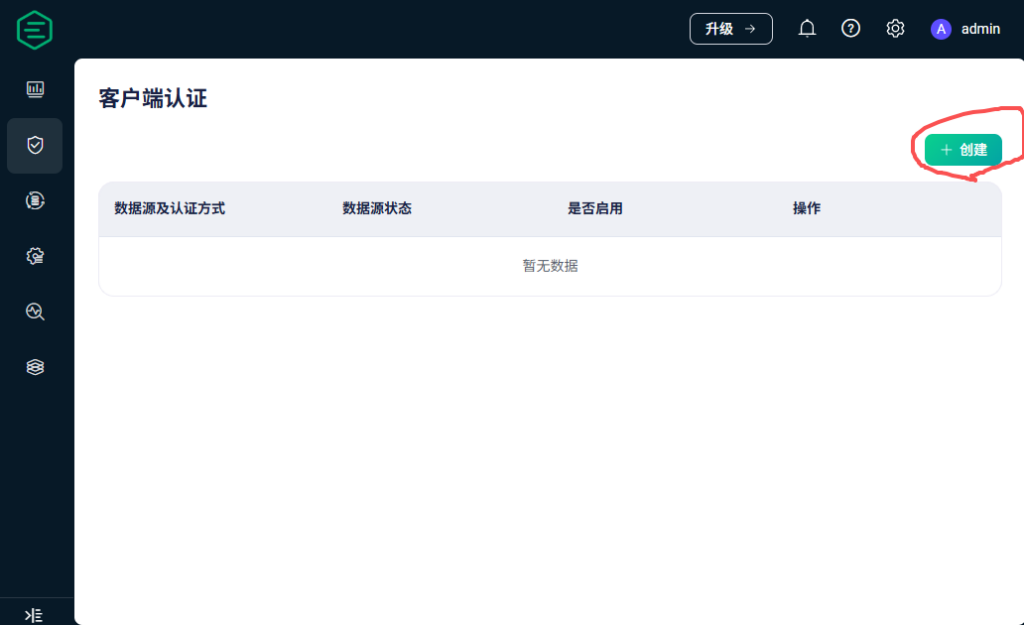
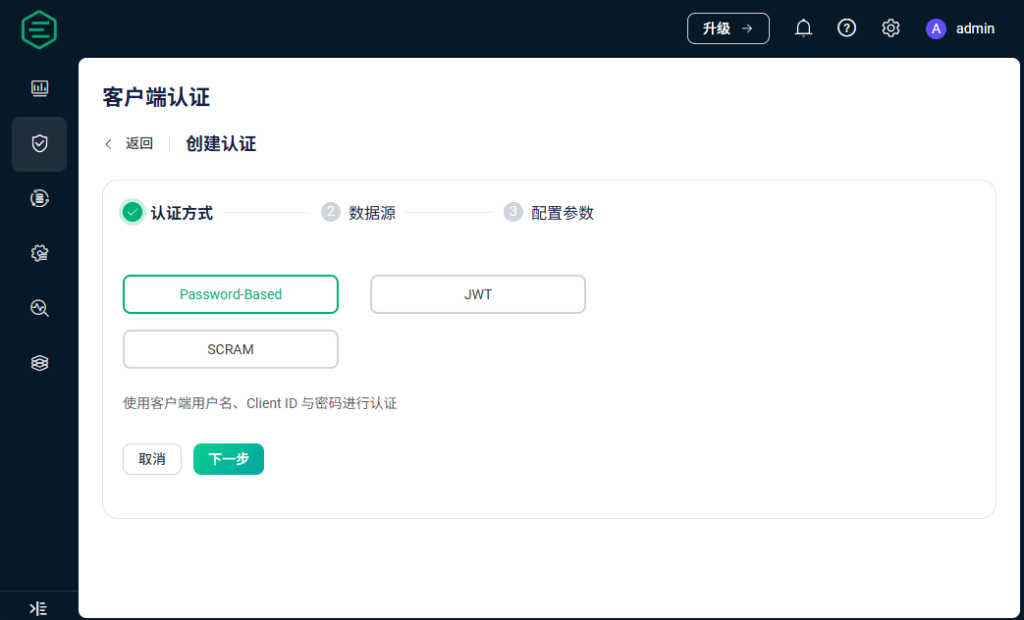
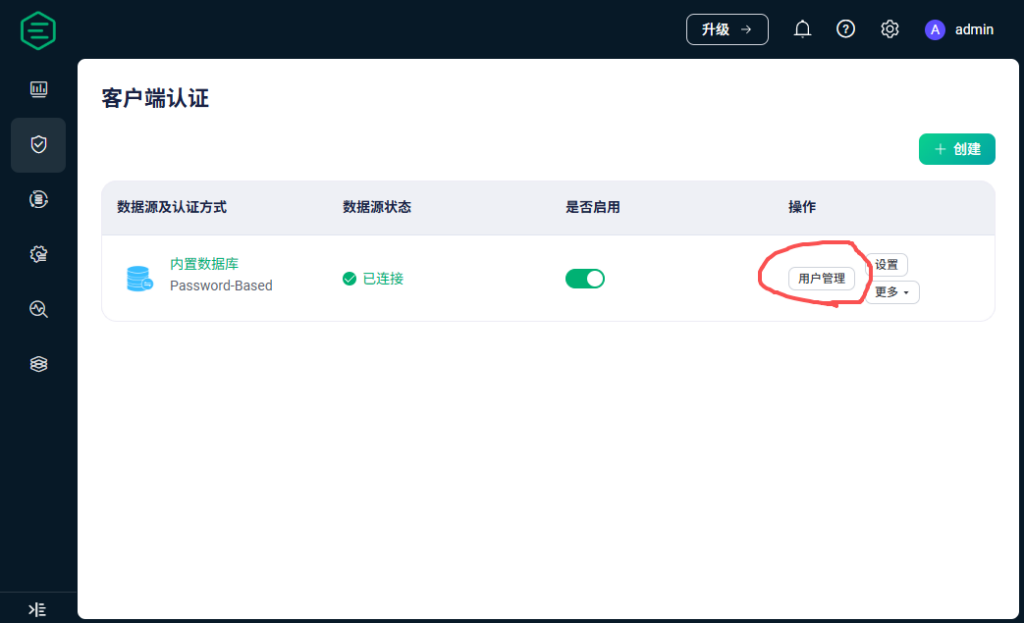
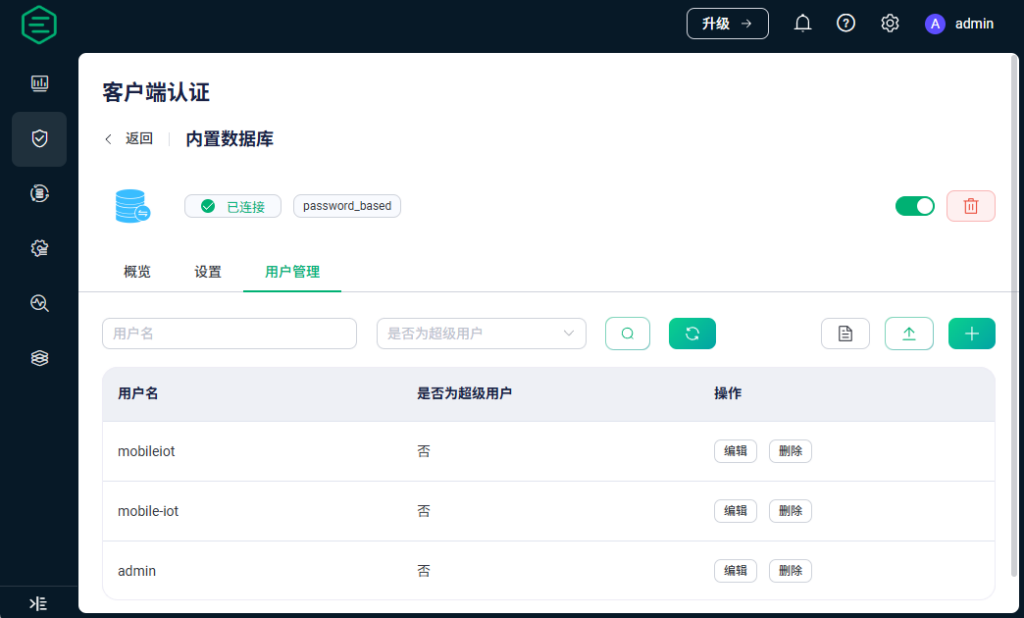
8、配置客户端认证
(1)创建内置数据库及认证方式
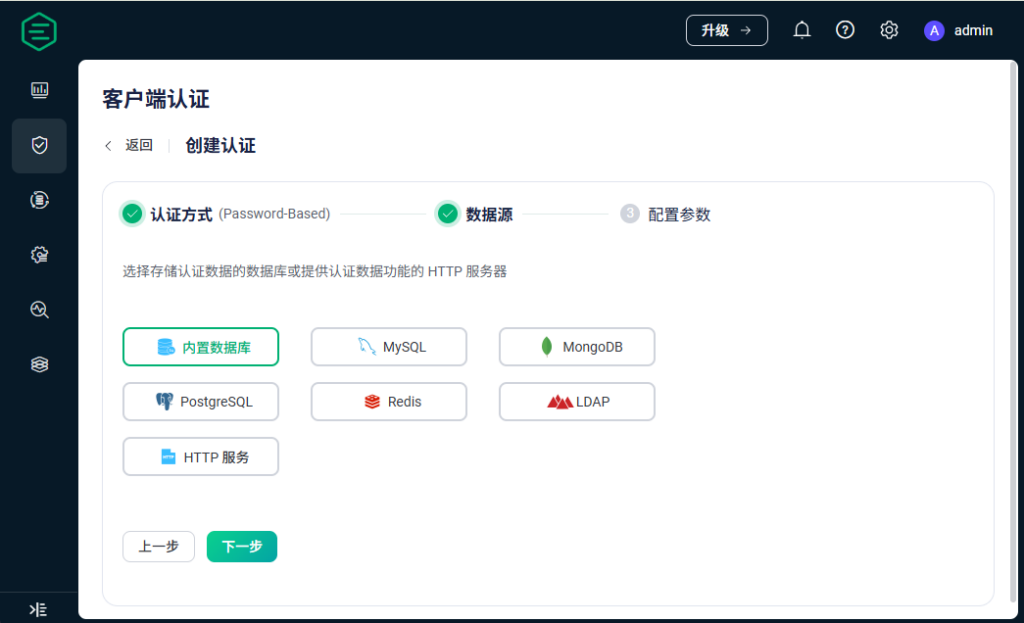
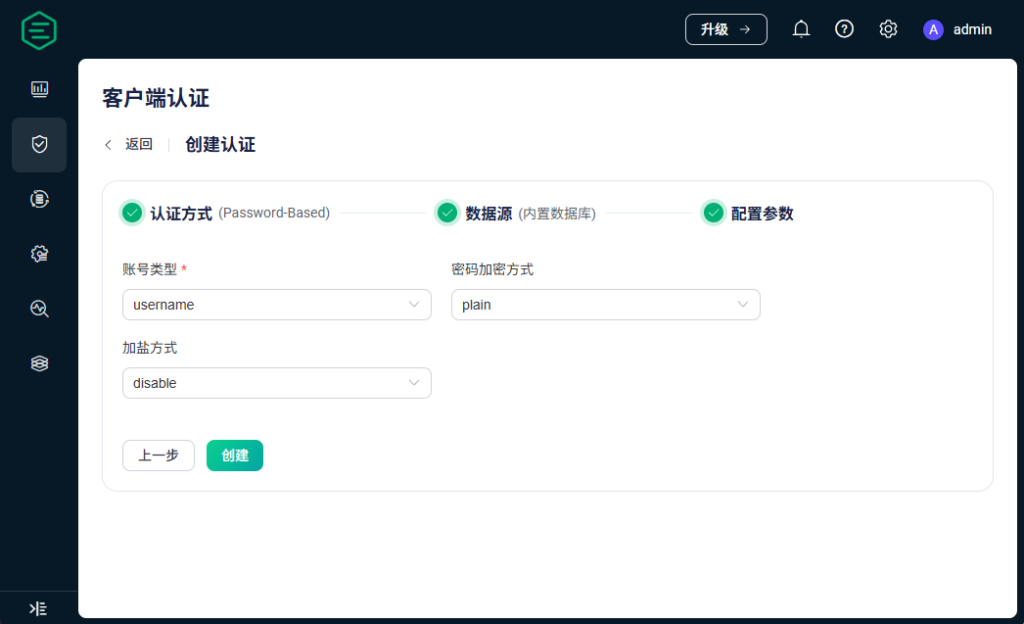

添加下面三个用户及对应的密码
mobile-iot   public
mobileiot    public123
admin        GESzFcMT49KuIV2
mobile-iot   public
mobileiot    public123
admin        GESzFcMT49KuIV2
效果如下:
(2)创建PostgreSQL数据源认证方式


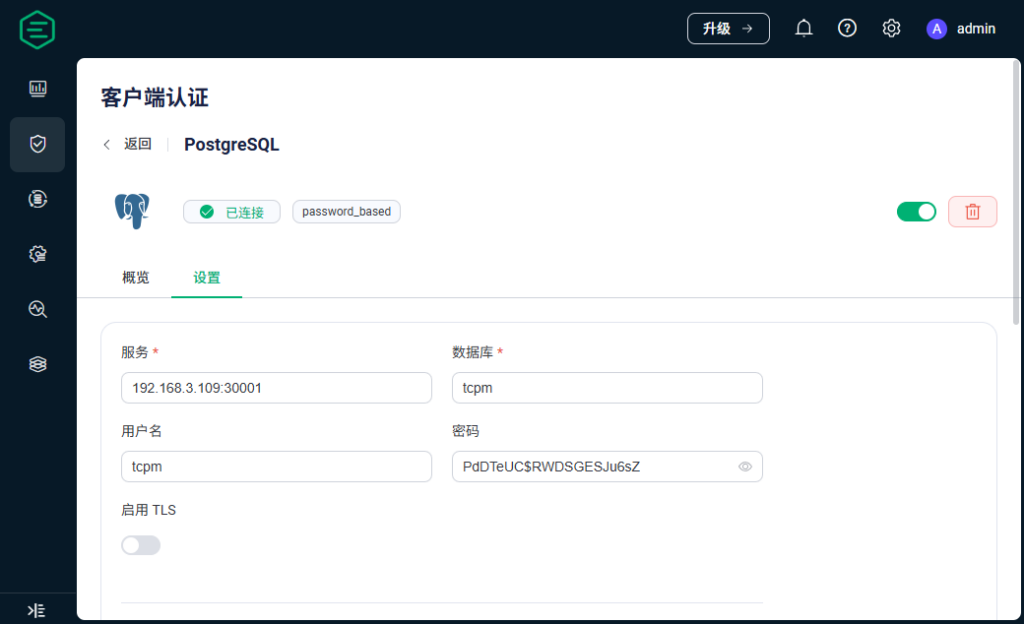
数据库信息如下:
服务:192.168.3.109:30001
数据库:tpm
用户名:tpm
密码:PdDTeUJu6sZ
SQL:SELECT password_hash FROM v_mqtt_user where username = ${username} LIMIT 1
服务:192.168.3.109:30001
数据库:tcpm
用户名:tcpm
密码:PdDTeUC$RWDSGESJu6sZ
SQL:SELECT password_hash FROM v_mqtt_user where username = ${username} LIMIT 1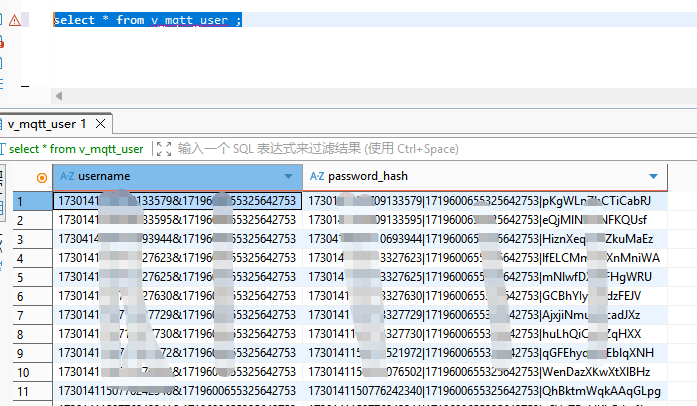
9、配置客户端授权

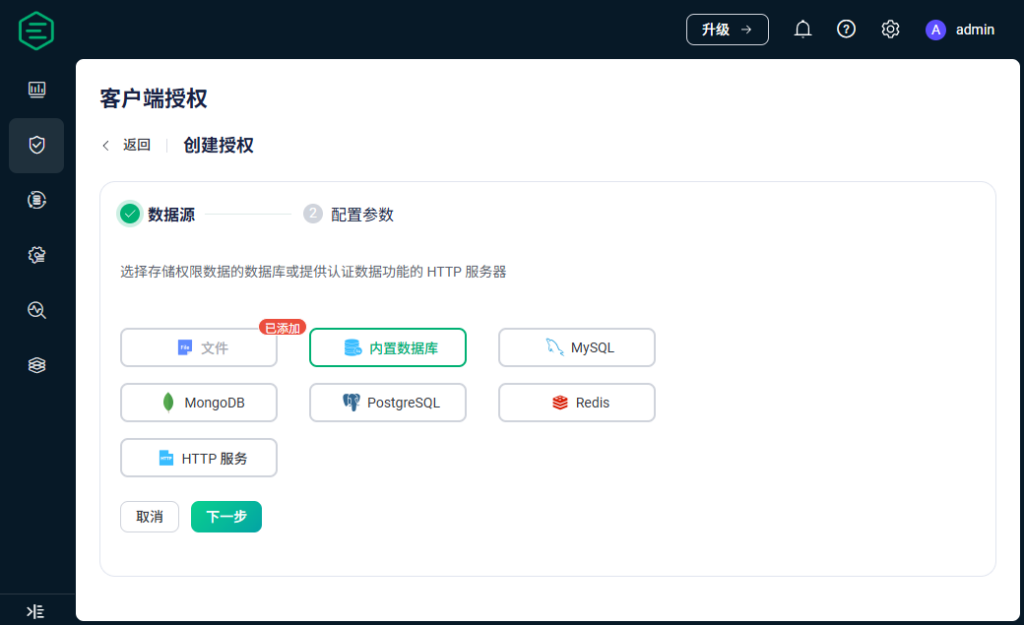
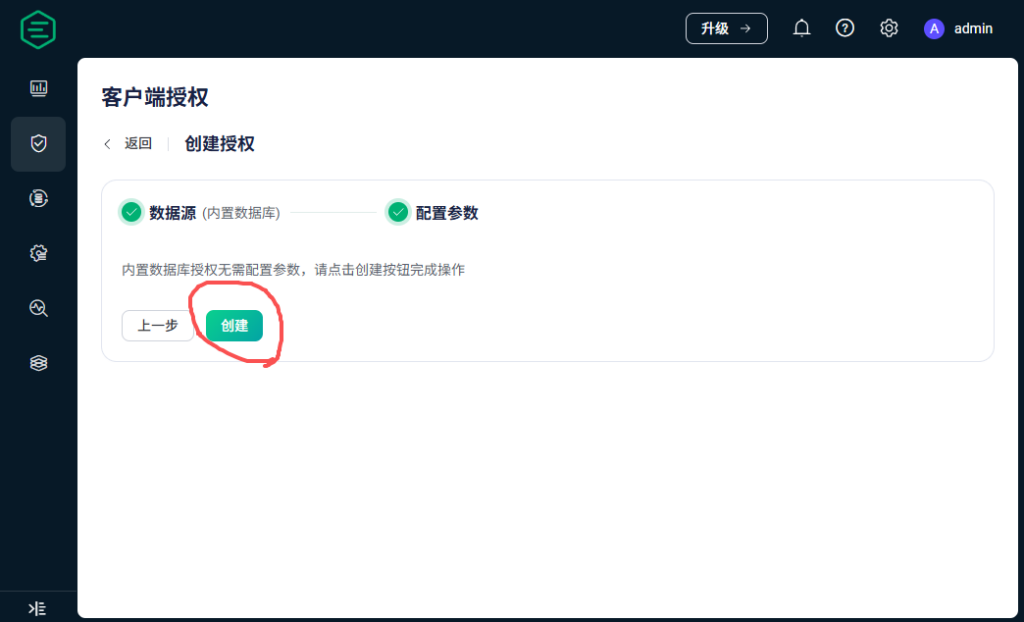
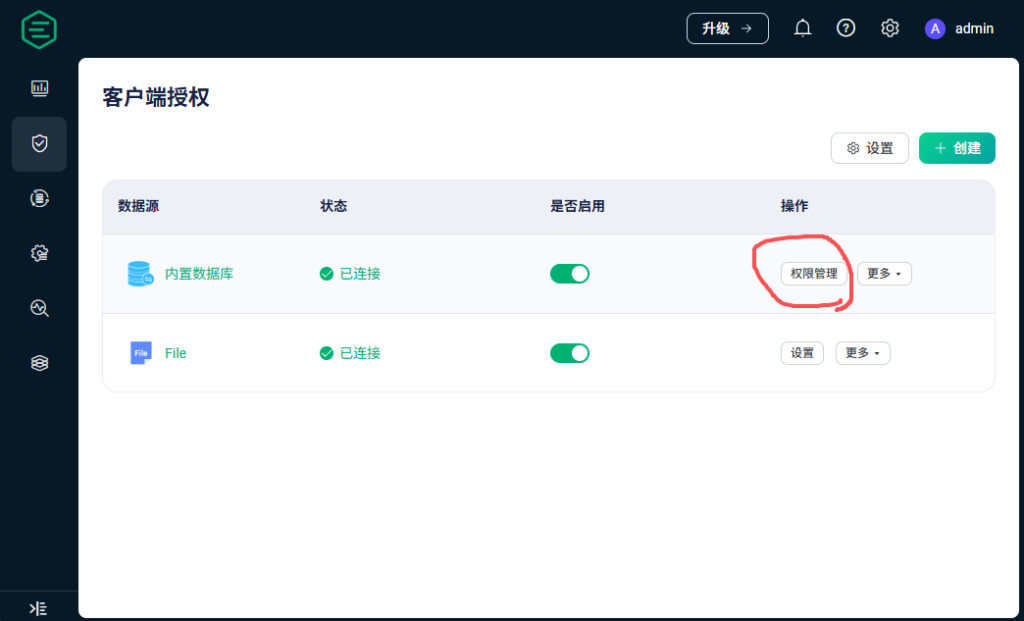
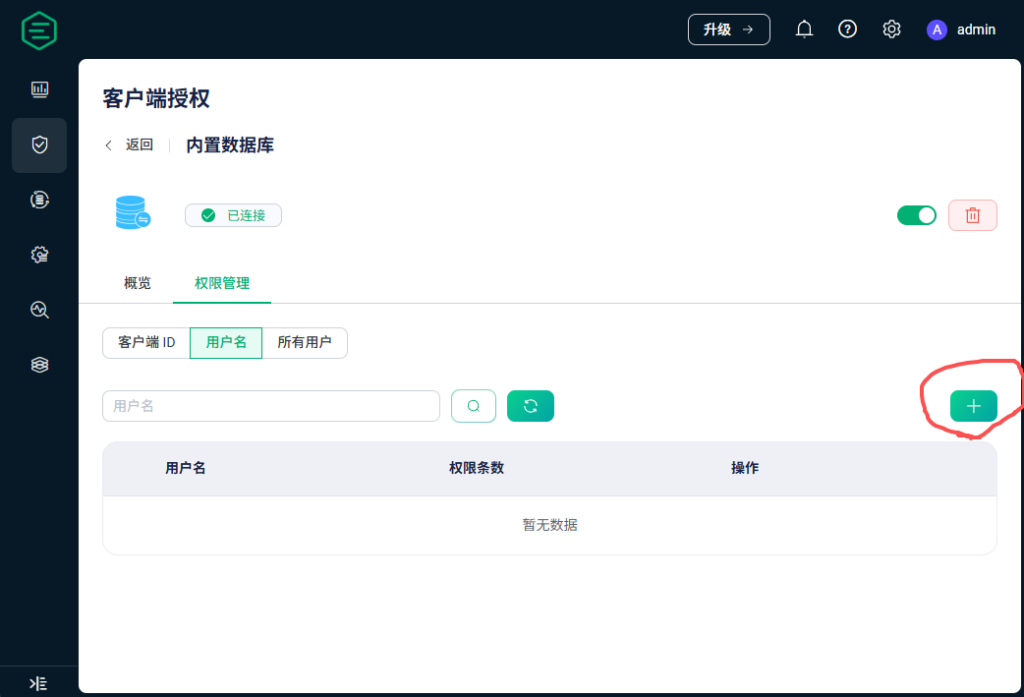
添加下面的条目:
| 用户名 | 操作 | 权限 | 主题 |
|---|---|---|---|
| mobileiot | 订阅时 | 允许 | /app/+/+/hardware/operate/result |
| mobileiot | 订阅时 | 允许 | /app/+/+/hardware/disk/check |
| mobile-iot | 订阅时 | 允许 | /app/+/+/hardware/operate/result |
| mobile-iot | 订阅时 | 允许 | /app/+/+/hardware/disk/check |
| admin | 发布和订阅时 | 允许 | # |