安装ceph
wget -q -O- 'https://download.ceph.com/keys/release.asc' | sudo apt-key add -

echo deb https://download.ceph.com/debian-octopus/ focal main | sudo tee /etc/apt/sources.list.d/ceph.list

apt update
apt install -y ceph ceph-common
配置ceph.conf
vim /etc/ceph/ceph.conf[global]
fsid = 6f4fcaf5-0514-401f-bd9d-19a54dca4388
mon initial members = ceph1,ceph2,ceph3
mon host = ceph1,ceph2,ceph3
public network = 192.168.2.0/24
cluster network = 192.168.2.0/24
auth cluster required = cephx
auth service required = cephx
auth client required = cephx
osd journal size = 8192
osd pool default size = 3
osd pool default min size = 2
osd pool default pg num = 2048
osd pool default pgp num = 2048
osd crush chooseleaf type = 1- fsid:用于唯一标识本集群,可以使用uuidgen命令生成。
创建key
ceph-authtool --create-keyring /tmp/ceph.mon.keyring --gen-key -n mon. --cap mon 'allow *'

ceph-authtool --create-keyring /etc/ceph/ceph.client.admin.keyring --gen-key -n client.admin --cap mon 'allow *' --cap osd 'allow *' --cap mds 'allow *' --cap mgr 'allow *'

ceph-authtool --create-keyring /var/lib/ceph/bootstrap-osd/ceph.keyring --gen-key -n client.bootstrap-osd --cap mon 'profile bootstrap-osd'

ceph-authtool /tmp/ceph.mon.keyring --import-keyring /etc/ceph/ceph.client.admin.keyring

ceph-authtool /tmp/ceph.mon.keyring --import-keyring /var/lib/ceph/bootstrap-osd/ceph.keyring

chown -R ceph.ceph /var/lib/ceph
创建监视器映射
命令格式:
monmaptool --create --add {node1-id} {node1-ip} --fsid {cluster uuid} /tmp/monmap
monmaptool --add {node2-id} {node2-ip} --fsid {cluster uuid} /tmp/monmap
示例如下:
monmaptool --create --add ceph1 192.168.2.51 --fsid 6f4fcaf5-0514-401f-bd9d-19a54dca4388 /tmp/monmap

monmaptool --add ceph2 192.168.2.52 --fsid 6f4fcaf5-0514-401f-bd9d-19a54dca4388 /tmp/monmap

monmaptool --add ceph3 192.168.2.53 --fsid 6f4fcaf5-0514-401f-bd9d-19a54dca4388 /tmp/monmap

chown -R ceph.ceph /tmp/ceph.mon.keyring
隔离ceph
pvcreate /dev/sdb
vgcreate ceph-vg /dev/sdb
lvcreate --extents 65535 -n ceph ceph-vg
mkfs.ext4 /dev/ceph-vg/ceph
tune2fs -c0 -i0 /dev/ceph-vg/ceph
mv /var/lib/ceph/ /var/lib/ceph.old
mkdir /var/lib/ceph
vim /etc/fstab
       /dev/ceph-vg/ceph       /var/lib/ceph   ext4    defaults        0 1
mount -a
cp -fr /var/lib/ceph.old/. /var/lib/ceph/
chown -R ceph.ceph /var/lib/ceph
添加其他节点
#节点二
scp /etc/ceph/ceph.conf ceph2:/etc/ceph/ceph.conf
scp /etc/ceph/ceph.client.admin.keyring ceph2:/etc/ceph/ceph.client.admin.keyring
scp /var/lib/ceph/bootstrap-osd/ceph.keyring ceph2:/var/lib/ceph/bootstrap-osd/ceph.keyring
scp /tmp/monmap ceph2:/tmp/monmap
scp /tmp/ceph.mon.keyring ceph2:/tmp/ceph.mon.keyring
chown -R ceph.ceph /tmp/ceph.mon.keyring

#节点三
scp /etc/ceph/ceph.conf ceph3:/etc/ceph/ceph.conf
scp /etc/ceph/ceph.client.admin.keyring ceph3:/etc/ceph/ceph.client.admin.keyring
scp /var/lib/ceph/bootstrap-osd/ceph.keyring ceph3:/var/lib/ceph/bootstrap-osd/ceph.keyring
scp /tmp/monmap ceph3:/tmp/monmap
scp /tmp/ceph.mon.keyring ceph3:/tmp/ceph.mon.keyring
chown -R ceph.ceph /tmp/ceph.mon.keyring
启动监视器
#节点1
ceph-mon --cluster ceph --mkfs -i ceph1 --monmap /tmp/monmap --keyring /tmp/ceph.mon.keyring
chown -R ceph.ceph /var/lib/ceph
systemctl enable ceph-mon@ceph1
systemctl start ceph-mon@ceph1

#节点2
ceph-mon --cluster ceph --mkfs -i ceph2 --monmap /tmp/monmap --keyring /tmp/ceph.mon.keyring
chown -R ceph.ceph /var/lib/ceph
systemctl enable ceph-mon@ceph2
systemctl start ceph-mon@ceph2

#节点3
ceph-mon --cluster ceph --mkfs -i ceph3 --monmap /tmp/monmap --keyring /tmp/ceph.mon.keyring
chown -R ceph.ceph /var/lib/ceph
systemctl enable ceph-mon@ceph3
systemctl start ceph-mon@ceph3
安装mgr
安装第一个mgr节点
ceph auth get-or-create mgr.ceph1 mon 'allow profile mgr' osd 'allow *' mds 'allow *'输出如下内容:
[mgr.ceph1]
	key = AQD1G/9jB0U0IRAAVNjTUQ2ACQPkl1wSJUp7Mw==
mkdir /var/lib/ceph/mgr/ceph-ceph1
#将上面输出的内容填写到下面的这个文件中
vim /var/lib/ceph/mgr/ceph-ceph1/keyring

chown -R ceph.ceph /var/lib/ceph
chmod 600 /var/lib/ceph/mgr/ceph-ceph1/keyring
systemctl enable ceph-mgr@ceph1
systemctl start ceph-mgr@ceph1
systemctl status ceph-mgr@ceph1
添加新的mgr节点
重复上面的步骤即可以安装备用mgr节点,注意更改节点标识。
运行管理界面
在mgr的主节点上执行如下操作
ceph mgr module enable dashboard
ceph dashboard create-self-signed-cert
#输入自己需要设置的密码存放在名为passwd的文件中
cat "mypassword" > ./passwd
ceph dashboard ac-user-create admin -i passwd administrator
在浏览器中输入地址:http://ceph1:8443即可看到管理界面了。
添加磁盘并启动osd
ceph-volume lvm prepare --bluestore --data /dev/sdc

#在每个节点上执行相关操作,注意更新osd id与fsid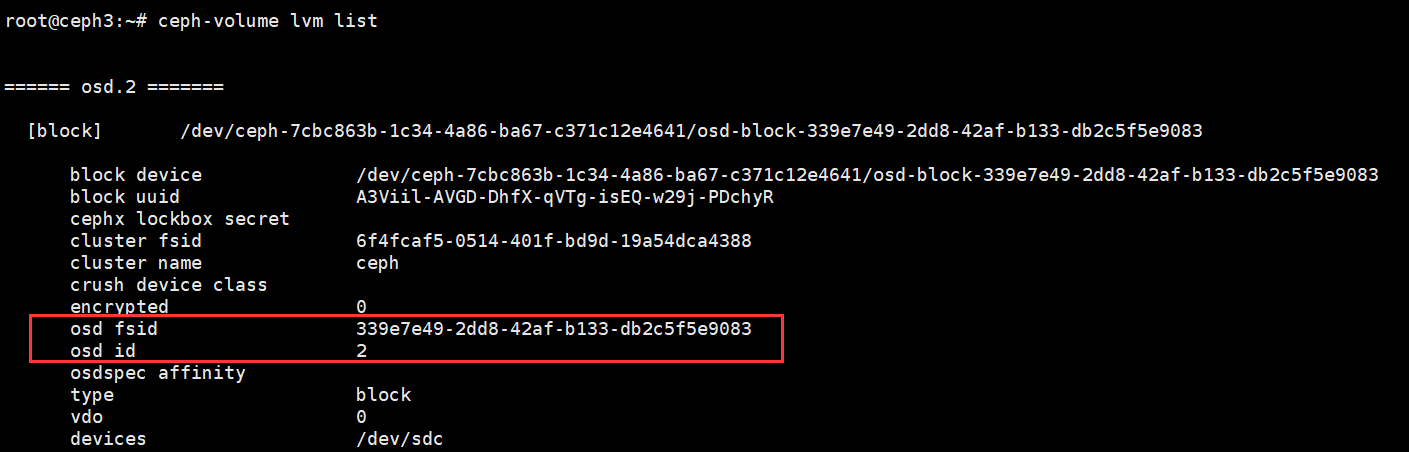
ceph-volume lvm activate --bluestore 0 af814056-22fd-4e2e-afcc-60c99d5eee39 - 命令格式:ceph-volume lvm activate 【osd id】 【osd fsid】,osd id与fsid可能通过ceph-volume lvm list进行查看
使用命令:ceph -s 查看集群的运行情况。
一些问题解决
1、关于msgr2
  cluster:
    id:     6f4fcaf5-0514-401f-bd9d-19a54dca4388
    health: HEALTH_WARN
            3 monitors have not enabled msgr2
解决:
在每个mon节点上执行如下命令。
ceph mon enable-msgr22、关于不安全模式
  cluster:
    id:     6f4fcaf5-0514-401f-bd9d-19a54dca4388
    health: HEALTH_WARN
            mons are allowing insecure global_id reclaim
解决:
在任意mon节点上执行下面的操作
ceph config set mon auth_allow_insecure_global_id_reclaim false